Terraform is one of the world’s most popular Infrastructure as Code (IaC) tools. It uses a declarative language and stores the current state of all deployed and managed infrastructure into a file, which can be stored locally or remotely. This file describes current infrastructure configurations and is used to plan and deploy changes via files and modules that define the new state.
Occasionally, there is a need to manage resources via Terraform that were created externally. In such cases, we can use the Terraform Import command to onboard these preexisting resources. However, there are potential pitfalls and dangers when doing so. During this article, we will help you avoid these problems by stepping through some simple examples and providing several recommendations as we go.
Terraform Import use cases
The table below summarizes the use cases for the Terraform Import command.
| Use Case | Explanation |
|---|---|
| Import old resources | Organizations can import resources created with alternative tools or methods |
| Import resources created outside Terraform. | When Terraform was deployed, it may not have been universally adopted. As such, there may have been infrastructure additions/amendments made outside of Terraform |
| Loss of Terraform state file. | The state file can be deleted or become irreversibly corrupt |
| Re-factoring / Amending Terraform code structure | As an environment scales, there may be a need to re-factor or re-structure Terraform modules and other constructs |
Getting started with the import process
When infrastructure is deployed using Terraform, a state file is created. Terraform uses this to manage and track all created resources. Resources created outside Terraform are imported into the Terraform state file when we wish to manage them.
However, the import process is not always smooth sailing. If the full details of the resource are not provided in the working directory, subsequent Terraform actions can amend or even delete the resource. This can occur when the desired state described in the manifest files does not accurately match the imported resource.

Hashicorp has indicated that they will remediate the issue in a future version of Terraform. See here for details. At present, though, the import process remains a two-step procedure that should be planned and implemented with caution.
Why use the import command?
You might want to import existing resources into a Terraform-managed deployment for several reasons:
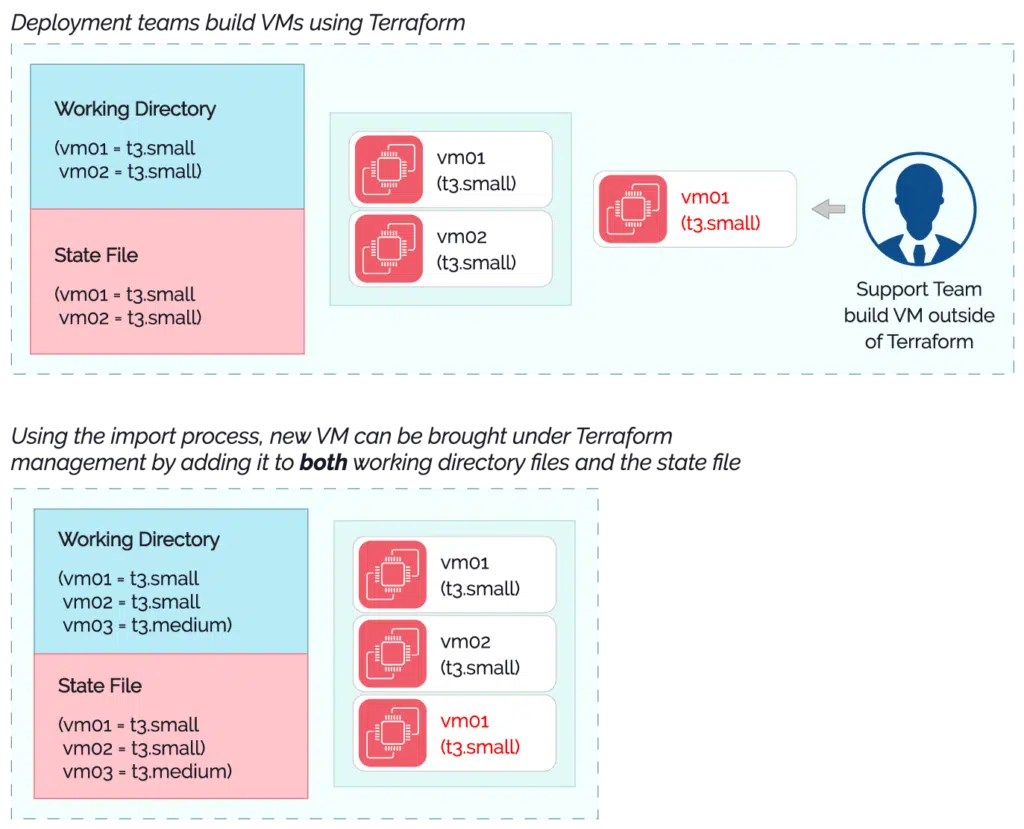
- Even in large corporations, it is common for initial cloud deployments to be carried out using the cloud provider’s console or via an iterative script
- Organizations may also have used an alternative infrastructure as a code toolset (such as AWS CloudFormation, or Azure ARM templates)
- Even if Terraform was chosen as the primary deployment tool, there are still occasions when infrastructure may have been deployed by alternative means. For example, perhaps Terraform was trialed by some DevOps team members but not others.
- As mentioned, the state file contains a record of all Terraform deployed resources. While this file is usually protected, it could become corrupted or deleted despite following best practices. It then becomes necessary to re-create the file and re-import all previously referenced resources.
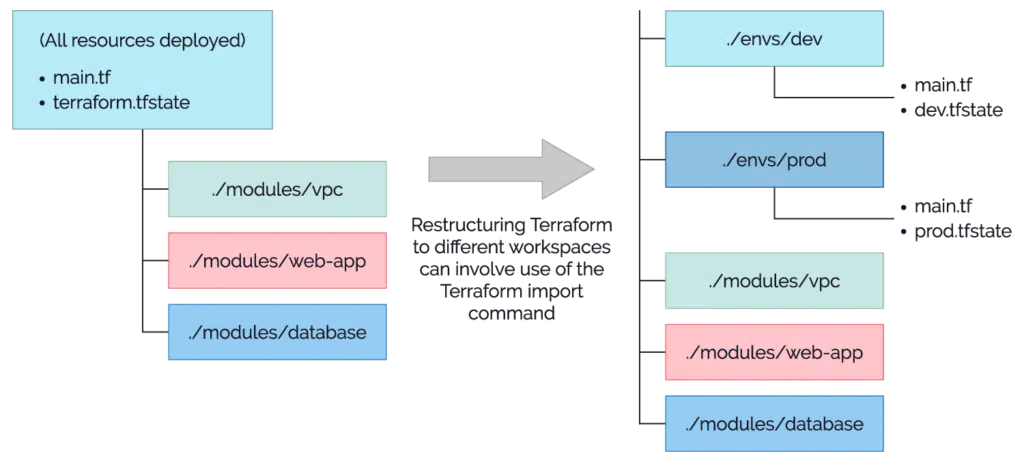
- The very structure of Terraform code is crucial to scaling. Poorly structured code may need to be re-factored, for example, into different workspaces. State and import commands can be used to re-balance resources into new structures.
Tutorial
Let’s run through a basic example where we will create one resource using Terraform and another manually. We will then import the manually created resource into Terraform. The Terraform code below deploys an AWS EC2 instance using the latest AWS Linux AMI.
locals {
   aws_region = "eu-west-1"
   name_prefix = "learning-terraform"
}

provider "aws" {
    region = local.aws_region
}

# Get latest AMI ID for AWS Linux
data "aws_ami" "aws_linux_latest" {
  most_recent = true

  filter {
    name = "name"
    values = ["amzn2-ami-hvm-*-x86_64-ebs"]
  }
  owners = ["amazon"]
}

# Create EC2 instance using AWS Linux AMI ID
resource "aws_instance" "web01" {
  ami = data.aws_ami.aws_linux_latest.id
  instance_type = "t3.micro"
  tags = {
    Name = "${local.name_prefix}-web01"
  }
}
Once deployed, manually create a new EC2 instance by using the AWS console Launch instances button.

❗For this tutorial, create the new EC2 instance in the default subnet and use the default security group within that VPC.

You can create any type of EC2 instance you wish, but please note the following information as you’ll need it to import your instance into Terraform successfully.
- Software image (AMI) ID
- Virtual server type (instance type)
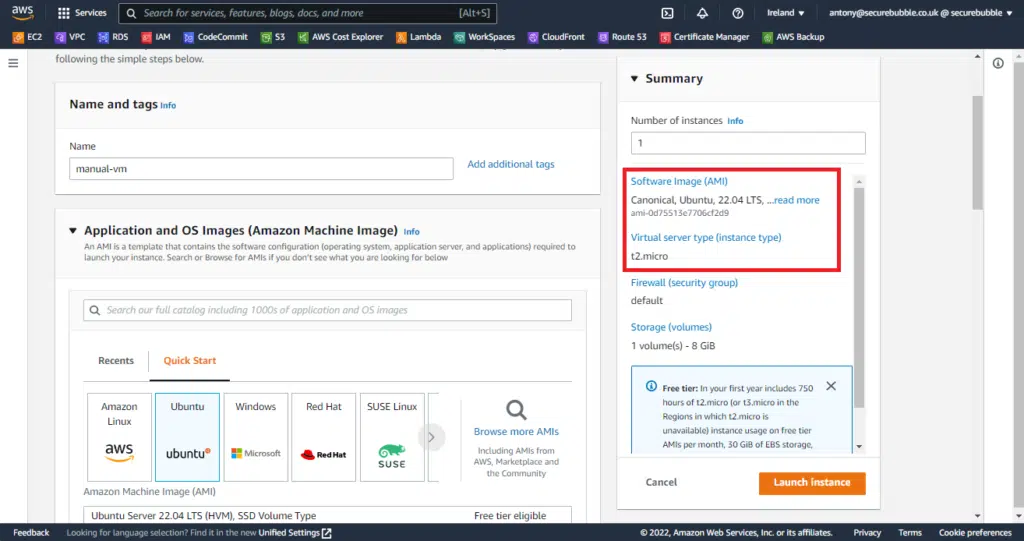
Once this has been completed, you will need the resources Instance ID.

Importing this EC2 instance is a two-step process. First, amend the Terraform code to represent the new resource you are importing, then run the import command.
💡 Pro-tip: In reality, you should populate the Terraform code with as much detail about the resource as possible. But in this tutorial, we will only use a placeholder to demonstrate how poor planning can result in unintended consequences.
Insert a placeholder for the EC2 instance by adding the following line to the bottom of the Terraform code. Record the name you’re assigning the new resource, i.e., web02, and notice that we have not included any information about the resource within our code.
locals {
   aws_region = "eu-west-1"
   name_prefix = "learning-terraform"
}

provider "aws" {
    region = local.aws_region
}

# Get latest AMI ID for AWS Linux
data "aws_ami" "aws_linux_latest" {
  most_recent = true

  filter {
    name = "name"
    values = ["amzn2-ami-hvm-*-x86_64-ebs"]
  }
  owners = ["amazon"]
}

# Create EC2 instance using AWS Linux AMI ID
resource "aws_instance" "web01" {
  ami = data.aws_ami.aws_linux_latest.id
  instance_type = "t3.micro"
  tags = {
    Name = "${local.name_prefix}-web01"
  }
}

# placeholder for new resource
resource "aws_instance" "web02" {
   #
}
Next, run the terraform import command. The syntax for this command is shown below:
terraform import <resource_type>.<resource_name><id_of_resource>
| <resource_type> | the type of the resource being imported i.e. aws_instance |
| <resource_name> | the name you are assigning to this resource in Terraform i.e. web02 |
| <id_of_resource> | The ID that your cloud provider allocated to the resource i.e. i-0704591175edb7b20 |
While we use AWS in this tutorial, the code syntax remains the same for any Terraform provider. This includes Azure and Google Cloud Platform (GCP).
The command we need to run for our case is provided below (note, your instance ID will be different):
terraform import aws_instance.web02 i-0704591175edb7b20

From our results, it may be easy to conclude that the process is complete. But not yet! We have imported the resource, but our Terraform code has not been updated with the relevant information.
Let’s see what happens when we run a terraform plan to demonstrate the problem.
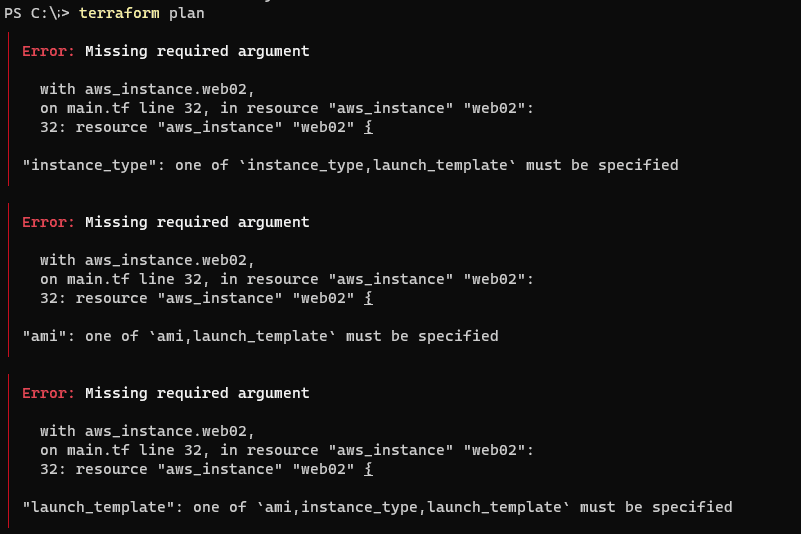
Thankfully, we should only be experiencing on-screen errors. But if we used partial or incorrect information in reality, it could result in both physical outage or object deletion. For example, referencing the wrong instance_type would cause the EC2 resource to reboot during the next run of the apply command (to set the new instance type):

We need to go back into our code and add the details of the instance we have imported. Ensure you add the AMI ID and Instance Type you recorded when creating your EC2 instance.
# placeholder for resource
resource "aws_instance" "web02" {
  ami = "ami-0d75513e7706cf2d9"
  instance_type = "t2.micro"
}
Let’s run the terraform plan command and see what will happen now.
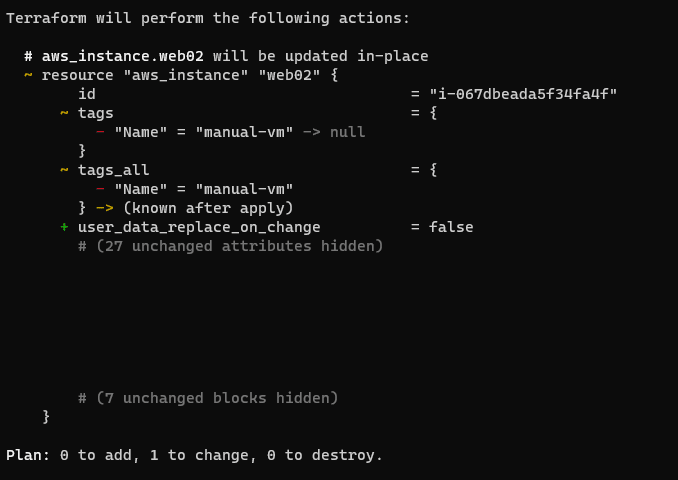
We still see a change, but this is because we’ve forgotten to put any Name tag information into our code. Because of this, the tag will be removed by Terraform. Removing a tag will not negatively affect the EC2 instance or cause an outage, but we want to ensure that there are zero changes. With that in mind, let’s go back into our code and add the Name tag.
# placeholder for resource
resource "aws_instance" "web02" {
  ami = "ami-0d75513e7706cf2d9"
  instance_type = "t2.micro"
  tags = {
    Name = "manual-vm"
  }
}
Running the terraform plan command again should show that no changes are required – the EC2 resource is now fully imported and managed by Terraform.

💡 Pro-tip: Use the terraform show command to show details of any resources imported into the Terraform state. You can use this information to compare your code against the actual configuration.
❗Note – Remember to delete your EC2 instances after completing this tutorial to avoid unnecessary costs.
Recommendations
As shown during our tutorial, the Terraform import process is simple when making minor changes but can quickly become complex as more resources are imported. This is particularly true for resources that interact or rely on other resources.
For example, let’s follow a familiar scenario and import an EC2 instance into Terraform. Judging by our tutorial, this should be (mostly) simple, but having imported the EC2 resource, we get an error during the terraform plan stage. A security group is attached to the EC2 instance, and we have neglected to account for this. We now need to import the security group AND the VPC where the resources are contained.
But it doesn’t end there. We also discover that the security group interacts with an RDS instance. Further, the EC2 instance has an instance profile attached, and this, in turn, is connected to an IAM role. Before long, we have a dozen or more resources that need importing just to manage this single EC2 instance. Without proper planning, all activities on a customer’s Terraform resources may need to be suspended to deal with problems like these.

To avoid these pitfalls, follow these recommendations:
- Planning is crucial. You must include not only the resources you intend to import but also any resources which interact with those, and so on
- As part of the planning process, write your Terraform code before any changes to help quicken deployment. When importing multiple resources, automate the import commands via a script
- Schedule all changes with your colleagues and ensure other modifications are suspended, especially when using CI/CD pipelines for deployment
- If using CI/CD pipelines, consider stopping these tasks and running the import commands (and subsequent plan and apply commands) manually. Doing so will give you more time to review any changes and allow colleagues to critique your plan. Triggering any Terraform processes you’re not aware of can also be prevented this way
- Carry out import tasks in small batches rather than in bulk. Use the terraform plan and apply commands regularly to ensure no unexpected consequences
- Back up the state file frequently, allowing for easy recovery should anything go wrong
- Use Terraform workspaces to limit the “blast radius” of any Terraform state issues and reduce the complexity of recovery
- Carefully consider why you are importing the resources – is it essential? Balance the risk and reward of importing the resource vs. managing them outside Terraform
Featuring guest presenter Tracy Woo, Principal Analyst at Forrester Research
Conclusion
The Terraform Import command allows Terraform to ingest externally created infrastructure and recover from faulty states. However, this operation only updates the state file, so resources must have their configurations recreated manually. As a result, importing external resources can be laborious and error-prone, even when partially automated. Despite extensive planning, a degree of risk remains, and the import command can have unintended consequences that lead to downtime or data destruction. Careful planning, communication, and consideration of dependencies are essential to your success.
Related Blogs

The End of Manual Optimization: Why We Acquired StormForge
Today is a big day for CloudBolt—we’ve officially announced our acquisition of StormForge. This marks a major milestone for us…


