There has been a big shift in the IT landscape over the last decade, with more companies migrating their infrastructure to cloud platforms like GCP, AWS, Azure, Alibaba Cloud, etc. While moving to a cloud platform yields several benefits, it also comes with its own set of challenges, including keeping all the distributed resources organized while ensuring visibility.
GCP uses tags and labels to help deal with this issue by bringing better organization and clarity to cloud deployments. It also lets administrators place mandatory tags to create standard practices across the organization. Tracking resources and running reports to get an accurate idea of cloud costs becomes significantly easier when tags and labels are used effectively.
The main difference between labels and tags is that labels are just annotations, whereas tags can be used to set conditions that can be triggered by policies. Tags also help in setting rules for communication between networks. In this article, we’ll discuss how to manage tags, the various ways that tags are used, and how the effective use of tags can help an organization understand costs and promote savings.
Executive summary
The following table summarizes the key topics covered in the article.
| Topic | Description |
|---|---|
| Managing GCP tags | The purpose of tags, types of tags, and how to configure roles to grant access to manage tags. |
| Creating GCP tags | How to create a tag using the CLI. |
| Listing GCP tags | How to list all the tag keys in an organization. |
| Attaching GCP tags to resources | An illustration of how a resource can only be assigned one value. |
| Detaching GCP tags to resources | The proper way to detach a tag from a resource using the CLI. |
| Creating GCP tag holds | How to create a tag hold to protect a tag value from being deleted. |
| Deleting GCP tag holds | How to properly delete a tag hold. |
| Deleting GCP tags | How to properly remove a tag by first detaching it from its resources and then deleting it. |
| Common use cases for GCP tags | Tags are mainly used to enforce policies. See how they are used with allow, deny, and network policies. |
| Best practices when using GCP tags | The three best practices to follow when using tags in your GCP environment. |
| Limitations of GCP tags | An overview of several limitations to keep in mind when working with tags. |
Managing GCP tags
A tag, like a label, is a key-value pair that can be assigned to a GCP resource. This is, however, where the similarity between the two ends. The main purpose of tagging a resource, as opposed to labeling it, is to apply policies based on set conditions.
Tags can either be created through the GCP console or the GCP CLI. However, to create, view, and manage tags, certain permissions must be assigned to the user, which offer fine-tuned control over tags and who can manage them. An administrator can choose which user has access to create, delete, and modify tags. A tag can also have a description, which is shown when a tag is retrieved and makes it easier to understand the purpose of the tag.
There are three types of roles required to work with tags.
Tag viewer role
A user can only view tags if the tagViewer role (roles/resourcemanager.tagViewer) is assigned to the user. The tagViewer roles include the following permissions.
| Permission | Description |
|---|---|
| resourcemanager.tagKeys.get | Fetch the tag key. |
| resourcemanager.tagKeys.list | List the tag key. |
| resourcemanager.tagValues.list | Fetch the tag value. |
| resourcemanager.tagValues.get | List the tag value. |
| listTagBindings | List tag values for a resource type. |
| listEffectiveTags | List tag values for a resource type and all its inherited tags. |

See the best multi-cloud management solution on the market, and when you book & attend your CloudBolt demo we’ll send you a $75 Amazon Gift Card.
Tag administrator role
This role assigns all the permissions in the view tags list along with the ability to create and update tags. The tagAdmin role (roles/resourcemanager.tagAdmin) also grants permission to set Identity and Access Management (IAM) policies. The tagAdmin role includes the following permissions on top of the tagViewer role.
| Permission | Description |
|---|---|
| resourcemanager.tagKeys.create | Create a tag key. |
| resourcemanager.tagKeys.update | Update a tag key. |
| resourcemanager.tagKeys.delete | Delete a tag key. |
| resourcemanager.tagKeys.getIamPolicy | Fetch an IAM policy for a tag key. |
| resourcemanager.tagKeys.setIamPolicy | Assign an IAM policy for a tag key. |
| resourcemanager.tagValues.create | Create a tag value. |
| resourcemanager.tagValues.update | Update a tag value. |
| resourcemanager.tagValues.delete | Delete a tag value. |
| resourcemanager.tagValues.getIamPolicy | Fetch an IAM policy for a tag value. |
| resourcemanager.tagValues.setIamPolicy | Assign an IAM policy for a tag value. |
Tag user role
The tagUser (roles/resourcemanager.tagUser) role lets you add or remove tags attached to a resource. It includes all the permissions of the tagViewer role. The list of permissions included in the tagUser role is shown in the table below:
| Permission | Description |
|---|---|
| createTagBinding | Attach a tag to a required resource. |
| deleteTagBinding | Delete a tag from a required resource. |
| resourcemanager.tagValueBindings.create | Create a tag value. |
| resourcemanager.tagValueBindings.delete | Delete a tag value. |
If the role is assigned at the organization level, this automatically ensures that the user has permission to create a tag value and attach it to the required resource. If the role is not created at the organizational level, it needs to be assigned to both the tag value and the required resource.
Assigning roles
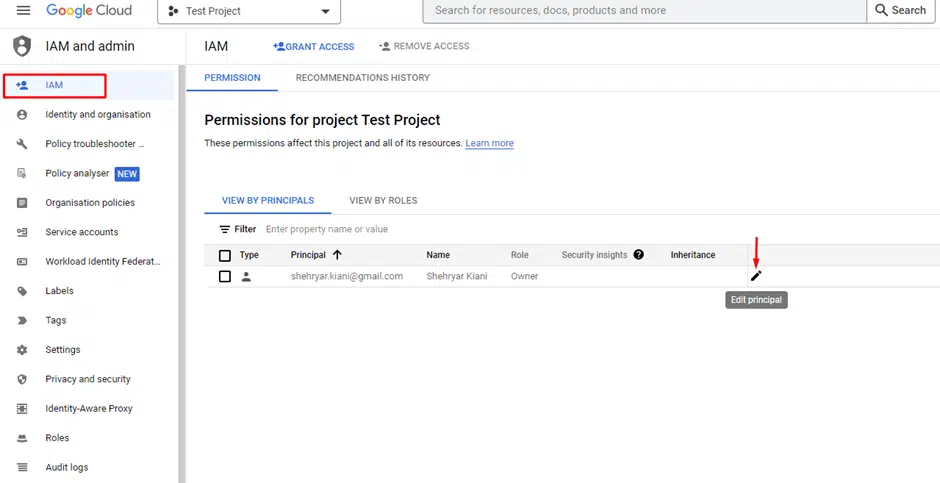
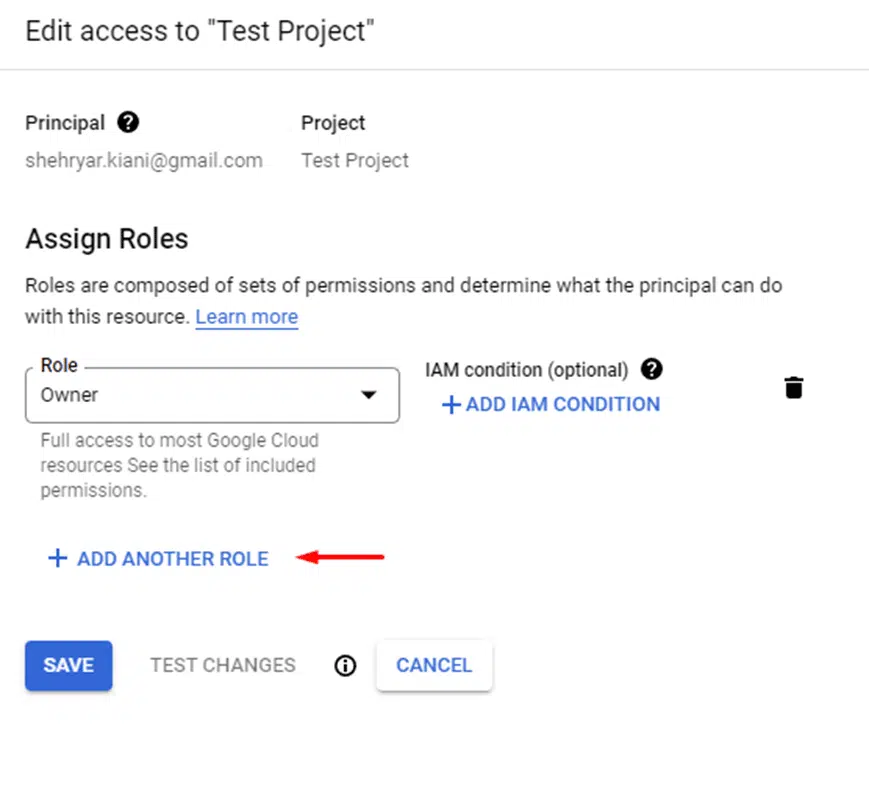
Roles can be assigned through the GCP console or Google Cloud CLI (gcloud CLI). To assign any of the three above-mentioned roles through the GCP console, follow these steps:
- Go to the IAM Page in the GCP Console.
- Select the principal to whom to assign the role, and click on Edit principal.
- Click on ADD ANOTHER ROLE
- Search and assign the required tag role.
- Click Save to complete the role assignment.
To assign the role through gcloud CLI, use the following command:
gcloud projects add-iam-policy-binding testproject \
--member=user@domain.com --role= roles/resourcemanager.tagViewer \
The command above assigns the tagViewer role to the member user@domain.com, where projects are the resource type, and the test project is the resource ID.

|
Platform
|
Multi Cloud Integrations
|
Cost Management
|
Security & Compliance
|
Provisioning Automation
|
Automated Discovery
|
Infrastructure Testing
|
Collaborative Exchange
|
|---|---|---|---|---|---|---|---|
|
CloudHealth
|
✔
|
✔
|
✔
|
||||
|
Morpheus
|
✔
|
✔
|
✔
|
||||
|
CloudBolt
|
✔
|
✔
|
✔
|
✔
|
✔
|
✔
|
✔
|
Creating GCP tags
Unlike labels, a tag can only ever have a single value for a given key; a tag is a key-value pair, which means it is made up of a key and its value. To create a tag, you must first create a key that describes what a tag is. The environment tag is one of the most commonly used tags; for example, if there are different stages of an environment running under the same project — such as production, test, and development — it would be a good idea to create a tag for each. A key for production is created in this case, and a value representing each of these three stages is created and assigned to the key. The key-value pair environment:production can then be attached to project folders that contain the production resources.
You can create a tag using the GCP Console, gcloud CLI, and API. We’ll use the CLI for this article. You can visit this link to see how to create keys using the GCP Console and API.
gcloud resource-manager tags keys create environment \
--parent=organizations/147852369099
This command will create a key called environment under the organization ID 147852369099. We can now create value for this key, but first, we need to find the namespaced_name for the key we just created. The namespaced_name is a unique human-readable display name for the key. Use the following command to view the key details.
gcloud resource-manager tags keys describe tagKeys/147852369099
This will display the following output:
name: tagKeys/147852369099
short_name: environment
namespaced_name: 147852369099/environment
parent: organizations/147852369099
To create a value, use the following command:
gcloud resource-manager tags values create production \
 --parent=147852369099/environment
This will create a value production for the key environment we created above and show the following output:
Creating tag value production in tag key 147852369099/environment...

<blocking wait until creation completes>
name: tagValues/1110654321
short_name: production
namespaced_name: 147852369099/environment/production
parent: tagKeys/147852369099

Use the following command to view the tag value.
gcloud resource-manager tags values describe
147852369099/environment/production

This will return the following output:

short_name: production
namespaced_name: 147852369099/environment/production
parent: tagKeys/147852369099
Listing GCP tags
To list all the tags’ keys in an organization, use the following command:
gcloud resource-manager tags keys list --parent= organizations/147852369099
This will list all the keys in organization 147852369099 along with the name (short_Name) and description (if available).
To list all the tags’ values associated with a key, use the following command:
gcloud resource-manager tags values list --parent= tagKeys/147852369099
Here, tagKeys/147852369099 is the namespaced_name of the tag key for which you want to find the associated tag value.
Attaching GCP tags to resources
Now that we have created a tag with its key-value pair and also seen how to configure roles to grant access to manage tags, let’s look at how to attach these tags to resources.
Each resource’s tag key can only be assigned one value. If a resource has the key-value pair environment:production attached to it, another key-value pair of the same key, environment:test, can not be attached.
Use the following command to attach a tag to a resource.
gcloud resource-manager tags bindings create \
--tag-value= tagValues/1110654321
--parent=//cloudresourcemanager.googleapis.com/projects/1234567890
--location=LOCATION
This will attach the tag with the key-value environment:production to the project with the ID 1234567890.
The complete resource ID for project 1234567890 with its API domain name is
//cloudresourcemanager.googleapis.com/projects/1234567890.Since we’re applying this tag to a global resource like a project, we don’t need to enter a location to reference the resource. If this tag were being applied to an instance resource like a virtual machine, then the location would be the location of the data center where this resource lives, such as us-east or us-west.
To list all the tags attached to a resource, use the following command:
gcloud resource-manager tags bindings list \
 --parent=//cloudresourcemanager.googleapis.com/projects/1234567890\
This will give us a complete list of all the tags attached to the project with project ID 1234567890. As mentioned before, the resource ID needs to include the full API domain name.
Detaching GCP tags from resources
Detaching a tag from a resource is just as easy as attaching a tag. All the values remain the same, but we change the command from tags bindings create to tags bindings delete.
To detach the tag we attached in the last example, use the following command:
gcloud resource-manager tags bindings delete \
--tag-value= tagValues/1110654321
--parent=//cloudresourcemanager.googleapis.com/projects/1234567890\
Creating a GCP tag hold
A tag hold is used to protect a tag value from being deleted. To create a tag hold, use the following command:
gcloud alpha resource-manager tags holds create tagValues/1110654321\
--holder=protect_production_tags
This command will create a tag holder for the tag value production for the key-value pair environment:production. This command will also create a holder name called protect_production_tags. Holders simply represent the resources that are using a given tag value.
To list the tag holders under a given tag value, run the following command.
gcloud alpha resource-manager tags holds list tagValues/1110654321
This command will list down the tag holder name we created in the above example along with other holders.
Deleting a GCP tag hold
To delete a tag value, the tag hold must first be deleted. To remove a tag hold, use the following command:
gcloud alpha resource-manager tags holds delete tagValues/1110654321/tagHolds /protect_production_tags
This command will delete the tag hold protect_production_tags on the project
//cloudresourcemanager.googleapis.com/projects/1234567890Deleting GCP tags
Deleting a tag may require additional steps, depending on whether the tag is being used. To delete a tag, it must first be detached, which we already covered earlier in this article.
If there is a hold on a tag, then the hold also needs to be removed, as we did in the previous section.
After ensuring that both the prerequisites mentioned above are met, run the following command to delete a tag.
gcloud resource-manager tags values delete tagValues/1110654321
This command will delete the tag value production from the key environment. Only if all the values associated with a key are deleted can the key itself be deleted. In our example, we saw how values like production, test, and development could be created against the key environment. To delete the key environment, all the values — in our case, production, test, and development — must be deleted first, following the same process to delete value as shown above.
Run the following command to delete a key after deleting all its values.
gcloud resource-manager tags keys delete tagKeys/147852369099
This will delete the key environment.
Common use cases for GCP tags
Now that we understand how to create and manage tags, we’ll look at the most common use cases for tags. Tags and labels are both key-value pairs, but tags can be used to enforce policies, whereas labels cannot.
The two most common use cases for tags are to allow or block access to resources and networks using policies.
Allow policies
Allow policies have one or more role bindings, which have the following structure.
"bindings": [
 {
  "role": ...,
  "members": ...,
  "condition": {
              "title": ...,
             "description": ...,
             "expression": ...
                }
 },
 ]
Condition is optional in bindings. Without a condition, the policy will always be true. A condition title is simply the name an admin chooses to give the condition and is required, whereas a description is optional.
The expression field is where we define the condition to either allow or block access. The expression field can use a variety of attributes to set the required condition. In this article, we’ll only be looking at tags; for additional reading on IAM conditions, visit this link.
Use the following expression to set the condition to true and allow access to any resource in the production environment.
resource.matchTag('147852369099/environment', 'production')
This expression will set the condition true for any roles mentioned in the binding along with any principals mentioned in the member. Any principal mentioned in the member that’s already part of the role set in the binding will have no effect.
Deny policies
Deny policies supersede allow policies and are used to deny access to specific principals regardless of their role and access policies. To learn more about deny policies, visit this link.
We’ll carry on with the same example of running three different stages of the environment in our project, which are production, test, and development. We only want members of admins@domain.com to be able to delete any production resources. Creating a deny rule will ensure that no one other than members of admins@domain.com can delete production resources regardless of their roles and permissions, since a deny rule supersedes all others.
 {
 "displayName": "only admins can delete production resources",
 "rules": [
  {
   "denyRule": {
    "deniedPrincipals": [
     "principalSet://goog/public:all"
    ],
    "exceptionPrincipals": [
     "principalSet://goog/group/admins@domain.com"
    ],
    "deniedPermissions": [
     "cloudresourcemanager.googleapis.com/projects.delete"
    ],
    "denialCondition": {
     "title": "Only for production resources",
     "expression": "resource.matchTag('147852369099/environment', 'production')"
    }
   }
  }
 ]
 }
In this deny rule, we must first set to deny access to all principals. We then set an exception for all the principals in admins@domain.com. Now we need to define the permission that we’re denying, which in this case is cloudresourcemanager.googleapis.com/projects.delete. Finally, we set the denial condition, which in this example, is for every resource that has the production tag attached to it.
Network policies
Unlike the tags we’ve created and discussed in this article, network tags are created at the time of creating an instance (e.g., a virtual machine or a template). Network tags can only be applied to a Virtual Private Cloud (VPC) network. A network tag will attach itself to all the network interfaces of the instance.
Once you’ve created a network tag, it can then be used to apply network rules in a Network Security Group (NSG) or Azure firewall.
The main purpose of network tags is to control traffic. A firewall rule can either allow or block traffic to instances based on the network tags attached to its network interfaces.
To create a network tag at the time of creating an instance, use the following command:
gcloud compute instances create virtual_machine1 \
    --zone us-central
    --tags tag_allow_internet \
    ...other parameters as needed.
This will create a VM (virtual_machine1) in the us-central zone with a network tag tag_allow_internet.
To add a network tag to an existing instance, use the following command:
gcloud compute instances add-tags virtual_machine2
--tags tag_allow_internet
This will create the same network tag on an existing VM.
To remove a network tag, use the following command:
gcloud compute instances remove-tags virtual_machine1 \
--tags tag_allow_internet
This command will remove the network tag tag_allow_internet from virtual_machine1.
We can now create firewall rules based on blocking internet traffic for all instances, excluding the ones with the tag_allow_internet tag. To find out more about creating firewall rules, please visit this link.
Best practices when using GCP tags
It’s important to ensure that your usage of GCP tags is definitively outlined within your organization. Additionally, automation and scripting tools can assist in creating tag templates for resources within your environment. The following are the prime best practices to follow when utilizing tags and, ultimately, optimizing organizational costs.
Using a safe default tag is highly recommended
A safe default tag is set up at the organizational level and thus inherited by all the resources in the project. A good example of this would be to create a tag with a short name safe tag with values default, enable, and disable. All the resources in the project will have the default value along with the policies that are applied by default. In case this needs to be disabled for a particular resource or group or resources under a particular folder, the tag value disable can be applied. If a particular resource under a folder where the default safe tag is set to disable is required to have the safe tag enable, it can be applied.
Always protect your important tag values by placing a tag hold
We discussed how to configure a tag hold earlier in this article. A tag hold will only let the admin with the required privileges remove the tag hold before the protected tag can be deleted. This is especially a good idea for any tags used in IAM policies.
Create naming conventions and guidelines for tags before starting to use them
It is easy to get confused with all the tag names and their functions when your deployment size starts to grow. Ensure that you have clear instructions on how to employ tags before you begin.
Limitations of GCP tags
There are several limitations to keep in mind when working with tags:
- GCP only allows 1,000 keys within an organization, and each of those keys can only have 1,000 values. Any key-value pair can be assigned to multiple resources.
- A resource can only have a maximum of 50 key-value pairs.
- The short name for the tag key has a maximum length of 63 characters.
- The tag key’s short name must begin and end with an alphanumeric character.
- The short name can not be changed and must be unique within the organization.
Conclusion
Although tags are not mandatory in all cases, they are vital for large-scale deployments. Without tags, it can become extremely difficult to manage a GCP environment, especially if it keeps growing. Tags, when used with effective policies, help to organize your GCP resources and provide clarity to a GCP environment. They also make it easier for an administrator to apply new policies or change policies for both existing and new resources.
Related Blogs

The Cloud Cost Fix Hidden in the Tools You Already Use
Cloud engineers are under constant pressure to optimize cloud costs—but the irony? Some of the best cost-saving features are already…


